One of the major problems of completing a finish is having bubbles in polyurethane. This is a common problem that every painter has experienced when applying polyurethane as the finishing coat. There are different reasons why this might happen, whether the shaking of the paint can or the type of wood you apply it to. It’s easy to apply polyurethane without bubbles by removing dust and sanding the surface and then applying a thin coat. In this guide, we cover all you need to know about how to remove bubbles in polyurethane and avoid having them in the first place.
Before looking at how to get rid of bubbles in wet polyurethane and dried finish, let’s look at the causes. There are different reasons during the painting process that can cause bubbles in polys after painting. Most of the time, the bubbles are gotten from the can being shaken instead of stirred. You might have stirred the paint, but during transport, paint can be shaken without you knowing, leading to bubbles in your finish.
Another cause can be using the wrong brush or the wrong type of applicator in general. If you use a brush instead of a roller, or vice versa, there will be bubbles on your polyurethane. You can use a natural bristle brush for oil-based polyurethane or a synthetic brush for water-based polys. Based on user reviews, the Pro Grade Paint Brush is a great synthetic brush for applying polyurethane.
You might end up with bubbles in your finish if you don’t prepare your brush properly. For instance, if you are using water-based polys, you should soak the brush in water first. On the other hand, you should soak the brush in mineral spirits for oil-based polys. A foreign object can get stuck in polyurethane when it is still drying, leading to bubbles in the finish. There are other causes of bubbles in polyurethane apart from the main ones explained above. These include:

Most of the bubbles will go away within five minutes, so you might not have to worry about polyurethane bubbles on the surface when applying them. If you have large bubbles that last after five minutes on the polyurethane, those bubbles will remain even after the finish has dried. You should try popping the bubbles before the paint dries, or you will have to sand off the bubbled paint after. But you can only pop water-based polys bubbles. Wet oil-based polys bubbles should be left alone and sanded down once they are dry to fix the problem. On the other hand, wet water-based polyurethane bubbles can be popped with a blow torch or a heat gun.
In this section, we will look at the steps to paint a finish to avoid bubbles. To apply polyurethane to stained or polished wood, you need the following tools:
You might also need a storage container, a drop cloth, lint-free rags, a cleaning container, and a sponge. Your workstation should be well-ventilated for your safety and health. Purchase the best woodworking aprons to protect your clothes while painting. Now, let’s look at how to remove bubbles in polyurethane when painting.
Before you start painting your polys as a finish, you need to prepare the space and your materials. You should place a drop cloth under your project to stop any stains on your workbench or the floor. This is optional, but it would make it easier to clean after you’re done painting. Also, you should stir the polyurethane Trusted Source Polyurethane Polyurethanes, some of the most versatile plastics materials in use today, are critical to a variety of applications and products that help enhance our everyday lives. www.americanchemistry.com so that you can get rid of the bubbles while you paint. Use a paint stirring stick to stir the paint, and this will most likely prevent the bubbles after you paint. If you’re in charge of transporting the paint, ensure you drive carefully so that they are not shaken. Or, instruct whoever is driving to be careful with the paint.
The place you are painting in should be completely dust-free, or else everything you do will be futile. If a foreign object flies into your smooth finish, this can create bubbles and mess up the finish. So, clean the entire place before you start painting. It’s best to use synthetic or natural brushes, but if you cannot purchase any of these and you’re working on a small job, you can consider a sponge or foam brush. A sponge brush can work, but it is not effective for applying polys to larger surfaces.
After you prepare and ventilate the work area, the next step is to get rid of dust. It’s important to get rid of the dust from the work surface. Ensure you get every little bit of it.
There are two ways to get rid of the dust on your wood and work surface. For one, you should get a vacuum cleaner, which we stated above in the list of materials needed. Slowly use the vacuum cleaner to clean every inch of the surface you are working on. Continue doing this until the dust is gone.
Another way you can remove the dust is with an air compressor, tack cloth, and steel wool. You can use these to clean the surface and wood thoroughly. Keep in mind that removing dust is another step that you have to go back to.
Now that you’ve gotten rid of the dust on the surface, you move to sanding. Although it’s okay to sand the wood before removing dust, you should not attempt applying your polyurethane to the wood without sanding the surface. It’s best to get one of our best sanders for furniture if you’re applying polys over your wooden furniture, as it might not be the same for a wooden floor.
The aim of sanding the surface is to make sure the piece of furniture is smooth, even if the person who sold it to you said it is. Sandpaper is measured in grit which shows you how coarse the sheet is. If you’re painting on old wood, you should use the toughest sandpaper is 80 grit. This will take care of all the rough spots on your project.
Once you’ve leveled the wood, you can use the 120 grit sandpaper to level it even more. Then, you should move on to the 180-grit sandpaper. Consider using the Warner Tool 34436 Sanding Block, as users have praised it for how easy it is against your hand yet effective on wooden surfaces. Another option is 220-grit sandpaper. The 220 grit is the finest and will ensure that your woodwork is splinter-free and smooth.
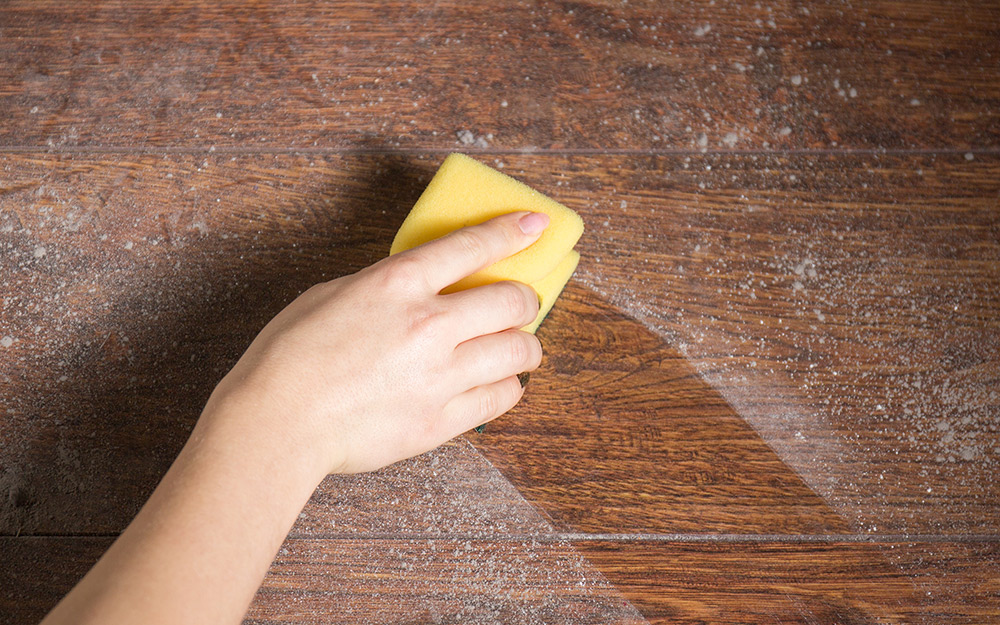
After you’ve sanded the surface with your sandpaper, you need to remove the dust again. This is because sanding would have produced a lot of dust, and if you paint on the dust, you end up with bubbles regardless of what you do.
Aside from getting rid of dust, this step will also make sure that the surface is smooth. As you clean, you will notice whether there are any rough spots on the wood. That will help in determining whether you need to sand more or move on. If you want to get rid of dust in this step, you shouldn’t use the vacuum cleaner. Instead, you should use a tack cloth to swipe by gliding it across the wood. If it gets caught along the way, you should sandpaper again and then remove the dust.
Now, you need to prepare the polyurethane so that you can make the first coat. As stated earlier, you should not shake the paint but mix it instead with the stirrer stick. Get paint of good quality for your project, on our list of the best paint for wood craft you can find a perfect option. Then, you should either apply it as it is or thin it, depending on how thick it looks.
For a professional finish, it’s best to use two thin coats. You can thin your polyurethane by diluting three parts of it with one part of the solvent.
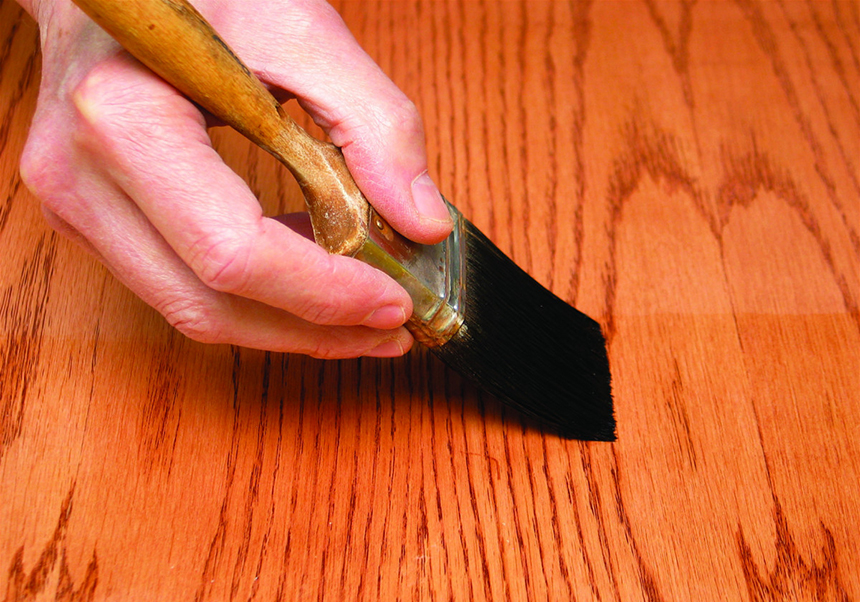
Now, apply your brush to the polyurethane mix gently and leave the extra paint to drip back into the bowl. When painting, don’t wipe the excess paint off the brush on the side of the container or splash the brush, or you will end up with bubbles.
Start painting from one edge of the wooden surface and stroke gently along the grain. You don’t have to apply pressure when painting, and you should use a bit more than the tip of the brush to avoid leaving brush marks. Work the brush back and forth by painting each row until you have covered the entire surface with paint, then repeat this for the edges and sides.
After this, you should leave the polyurethane to dry, and this can take up to 24 hours. Although some manufacturers say that you can apply another coat to the surface while the first one is still wet, this might not give you a chance to look out for bubbles and get rid of them.
You need to sand again in between the coats of polyurethane, but you need to make sure the first coat has dried completely. There are different kinds of sandpaper grit Trusted Source Sandpaper - Wikipedia Sandpaper and glasspaper are names used for a type of coated abrasive that consists of sheets of paper or cloth with abrasive material glued to one face. en.wikipedia.org , but the 220-grit sandpaper is along the grain of the wood. If you have tough and dried polyurethane on your surface, you should use steel wool or high grit sandpaper. One of the main benefits of using sanding is to get rid of any air bubbles that might be there. It will also make the surface have a smooth finish so that you can paint over a fresh surface.
When sanding, avoid pressing too hard on the dried polyurethane, or you will end up scratching or even getting rid of the first coat. Ensure that all the air bubbles are gone, and then use a tack cloth to remove the sanding dust on the surface. You can also use washable sponges to clean it and let the coat completely dry.
You might have heard that you should brush in one direction so that you avoid brush marks that will look ugly on the surface. But this is unnecessary. When you paint with polyurethane, the paint absorbs the finish and glistens, so it covers any marks. Just make sure that it follows the grain.
You need to repeat the steps of sanding and painting the last coat, making it thinner and thinner until you reach the look that you want. Ensure you avoid making a mess of the coat or getting sticky polys on the surface.
Keep in mind that if you are applying water-based polyurethane, you should focus on applying multiple thin coats using a synthetic brush and dampening it in water. When dampened with water, it avoids running on the surface, bubbling, or puddling. Also, if you’re using a roll to apply polyurethane on your surface, you should purchase a high-quality roller with mineral spirits. This prevents air pockets when you paint. Foam rollers, mohair, and microfibers are ideal for water-based polys, while a lambswool roller will do well with oil polys without causing bubbles.
You might want to paint the wood floor with polyurethane. To do this, use a damp T-Bar for a strip floor, while a damp roller can work for a paraquat and other complicated types of flooring. After the first coating, use 220 grit sandpaper for sanding it down, tack the floor, and then apply the second coat.
Another thing to keep in mind when painting with polyurethane is to avoid bumps. The main cause of bumps on a polyurethane finish is sawdust or dust particles that are left on the surface when you paint the second coat. You can get the bumps out by brushing lightly over the surface to break up the bubbles and bumps.
The best way to get rid of air bubbles from polyurethane is with sanding. You should try out 320-grit sandpaper for small bubbles on the surface. The 320 grit is one of the lighter sandpapers, so it would pop the bubbles without having to get rid of all the paint.
But large bubbles are harder to pop. You will need 80-100 grit sandpaper to sand down all the polyurethane on the surface until you have bare wood left. These are stronger sanding sponges that can get rid of the paint. Then, you will wipe the surface down with denatured alcohol Trusted Source Denatured alcohol - Wikipedia Denatured alcohol (also called methylated spirits in Australia, Canada, Ireland, New Zealand, South Africa, and the United Kingdom; wood spirit; and denatured rectified spirit) is ethanol that has additives to make it poisonous, bad-tasting, foul-smelling, or nauseating to discourage its recreational consumption. en.wikipedia.org , then start over. Another way to get rid of the bubbles on the surface is to tip them off. This is possible by running the brush stroke on the wood surface, but it has to be wet. If the paint is dry, then you will have to sand everything.
Some people might wonder if they can buff bubbles out of dried polyurethane. Buffing can be used to get rid of tiny dust nibs remaining in the last coat of dried polyurethane after painting. But, the bubbles in dried polyurethane are usually found in large pieces of dust or air pockets that are trapped in the finish. These are too thick fur buffing, so you should use sandpaper instead, preferably a 320-grit. It is also possible to use a torch to get bubbles out of polyurethane. When water-based polyurethane is still wet on the surface, you can use a blow torch to remove the bubbles before the finish dries. But, if you do this for a wet oil-based polyurethane it will not remove bubbles.
Now that you know how to prevent and get rid of bubbles in polyurethane, you can begin your next project. Simply get all the tools that you need, purchase high-quality paint, brushes, and rollers, and begin to create an excellent finish. Preventing or getting bubbles out of your polys work should not be too stressful as long as you’re using the right oil or water-based products. Also, allow the paint to dry completely before any additional coat so that you don’t mess up the finish. Finally, rolling without getting bubbles is hard, so lean towards the brush.